야놀자 클라우드플레어 API 교육 자료
1. Cloudflare의 API 2가지
1.1 RESTful API
일반적인 설정과 관리를 위한 API
문서
1.2 GraphQL
쿼리를 통해 대시보드에서 볼 수 없는 상세 데이터를 조회할 수 있는 API
문서
2. Cloudflare API 제한사항
2.1 RestFul API 제한사항
- https://developers.cloudflare.com/fundamentals/api/reference/limits/
- 사용자당 5분동안 1,200번 요청 가능.
- 1개의 Zone 에 대해서만 요청 가능
2.2 GraphQL 제한사항
- https://developers.cloudflare.com/analytics/graphql-api/limits/
- 한번에 1개의 Account만 조회 가능
- 한번에 10개까지의 Zone 조회 가능
- 5분동안 300번 쿼리 가능.
3. 인증방법
3.1 Global API Key
- 인증방법: 헤더에 {”X-Auth-Email”: 사용자이메일, “X-Auth-Key”: API Key} 삽입
- 계정 전체에 대한 접근 권한 부여
- 세부적인 권한 제어가 불가능하여 보안에 취약
3.2 API Token(권장)
- 사용방법: 헤더에 {”Authetication”: API Token} 삽입
- 특정 권한과 리소스에 대한 접근 제한 가능
- 필요한 취소한의 권한만 부여할 수 있어 보안 강화
3.3 API Token 생성
- 우측 상단의 아이콘을 클릭하고 My Profile로 이동한다.
- 왼쪽메뉴에서 API Tokens로 이동한다.
- Create Token 버튼을 누른다.
- 템플릿을 선택하거나 커스텀토큰을 선택한다.
- 이름을 입력하고 권한과 리소스, IP접근제어, 사용기간을 지정하고 계속한다.
- 설정을 검토하고 생성한다.
- 토큰이 발급되면 잘 저장한다.
4. GraphQL API 활용
4.1 엔드포인트
4.2 토큰 권한 부여
- Account: Account Analytics - Read
- Zone: Analytics - Read
4.3 GraphiQL 설치
GraphiQL은 편리하게 쿼리조회를 하기 위한 GraphQL 클라이언트 앱.
여러 사용방법이 있으나 다 어렵고...
크롬확장으로도 사용할 수 있다.
설치:
4.4 GraphiQL 사용
- 주소줄에
https://api.cloudflare.com/client/v4/graphql입력 - Header에 json 입력
{
  "Authorization": "Bearer <API_TOKEN>",
  "Content-Type": "application/json"
} - 쿼리 삽입(틀린 구문이 포함되어 있음)
{
  viewer {
    zones(filter: {zoneTag: "{ZONE_ID}"}) {
      httpRequests1hGroups(limit: 10, filter: {date_gt: "2023-10-01"}) {
        sum {
          bytes
          requests
        }
        dimensions {
          clientCountryName
          clientIP
        }
      }
    }
  }
} - 실행버튼
- 에러 발생에 대한 수정
- 스키마 확인
- Documentation Explorer 버튼
- Re-fetch GraphQL schema
4.5 스키마를 확인하는 다른 방법
- https://pages.johnspurlock.com/graphql-schema-docs/cloudflare.htmlhttps://pages.johnspurlock.com/graphql-schema-docs/cloudflare.html
- https://cfdata.lol/graphql/
4.6 curl로 쿼리
curl -X POST "https://api.cloudflare.com/client/v4/graphql" \
  -H "Authorization: Bearer {API_TOKEN}" \
  -H "Content-Type: application/json" \
  --data '{"query":"{viewer{zones(filter:{zoneTag:\"{ZONE_ID}\"}){httpRequests1hGroups(limit:10,filter:{date_gt:\"2023-10-01\"}){sum{bytes requests} dimensions{clientCountryName clientIP}}}}}"}'
4.7 다른 예제쿼리들
{
  viewer {
    zones(filter: {zoneTag: "ea34f3c3dca1d1d7fd498deb3eb3fee6"}) {
      httpRequestsAdaptiveGroups(
        limit: 100,
        filter: {date_gt: "2024-11-12"},
        orderBy: [count_DESC]
      ) {
        dimensions {
          clientRequestPath
        }
        count
      }
    }
  }
}
4.8 파이썬으로 쿼리해보기
import requests
import json

GRAPHQL_API = "https://api.cloudflare.com/client/v4/graphql"
API_TOKEN = "xxxxxx"
ZONE_ID = "xxxxx"

# GraphQL 쿼리 작성
GRAPHQL_QEURY = """
query {
    viewer {
        zones(filter: { zoneTag: %s }) {
            zoneTag
            httpRequestsAdaptiveGroups(
                limit: 5,
                filter: { datetime_gt: "2024-11-14T08:00:00Z" }
            ) {
                dimensions {
                    datetime
                }
                avg {
                    originResponseDurationMs
                }
            }
        }
    }
}
"""


def get_origin_response_time_from_cloudflare():
    # GraphQL 쿼리 작성
    query = GRAPHQL_QEURY % ZONE_ID

    # print(query)
    # 요청 헤더 설정
    headers = {
        "Authorization": f"Bearer {API_TOKEN}",
        "Content-Type": "application/json"
    }

    # 요청 본문 설정
    data = {
        "query": query
    }

    # API 요청 보내기
    response = requests.post(GRAPHQL_API, json=data, headers=headers)

    # 결과 출력
    if response.status_code == 200:
        print("요청 성공:")
        # JSON 데이터를 예쁘게 출력
        formatted_response = json.dumps(response.json(), indent=4)
        print(formatted_response)
    else:
        print(f"요청 실패: {response.status_code}")
        print(response.text)
        return False

    return response


def main():
    get_origin_response_time_from_cloudflare()


if __name__ == '__main__':
    main()
5. 파이썬 개발환경
5.1 파이썬 가상환경 만들기
wsl 또는 맥 터미널에서
$ mkdir Projects
$ cd Projects
$ mkdir myproject
$ cd myproject
$ python3 -m venv .venv
$ . .venv/bin/activate
5.2 vscode 실행
$ code .
5.3 vscode에서 파이썬 인터프리터 선택
윈도우에서는 F1 또는 Ctrl+Shift+P
맥에서는 F1 또는 Shift+Command+P
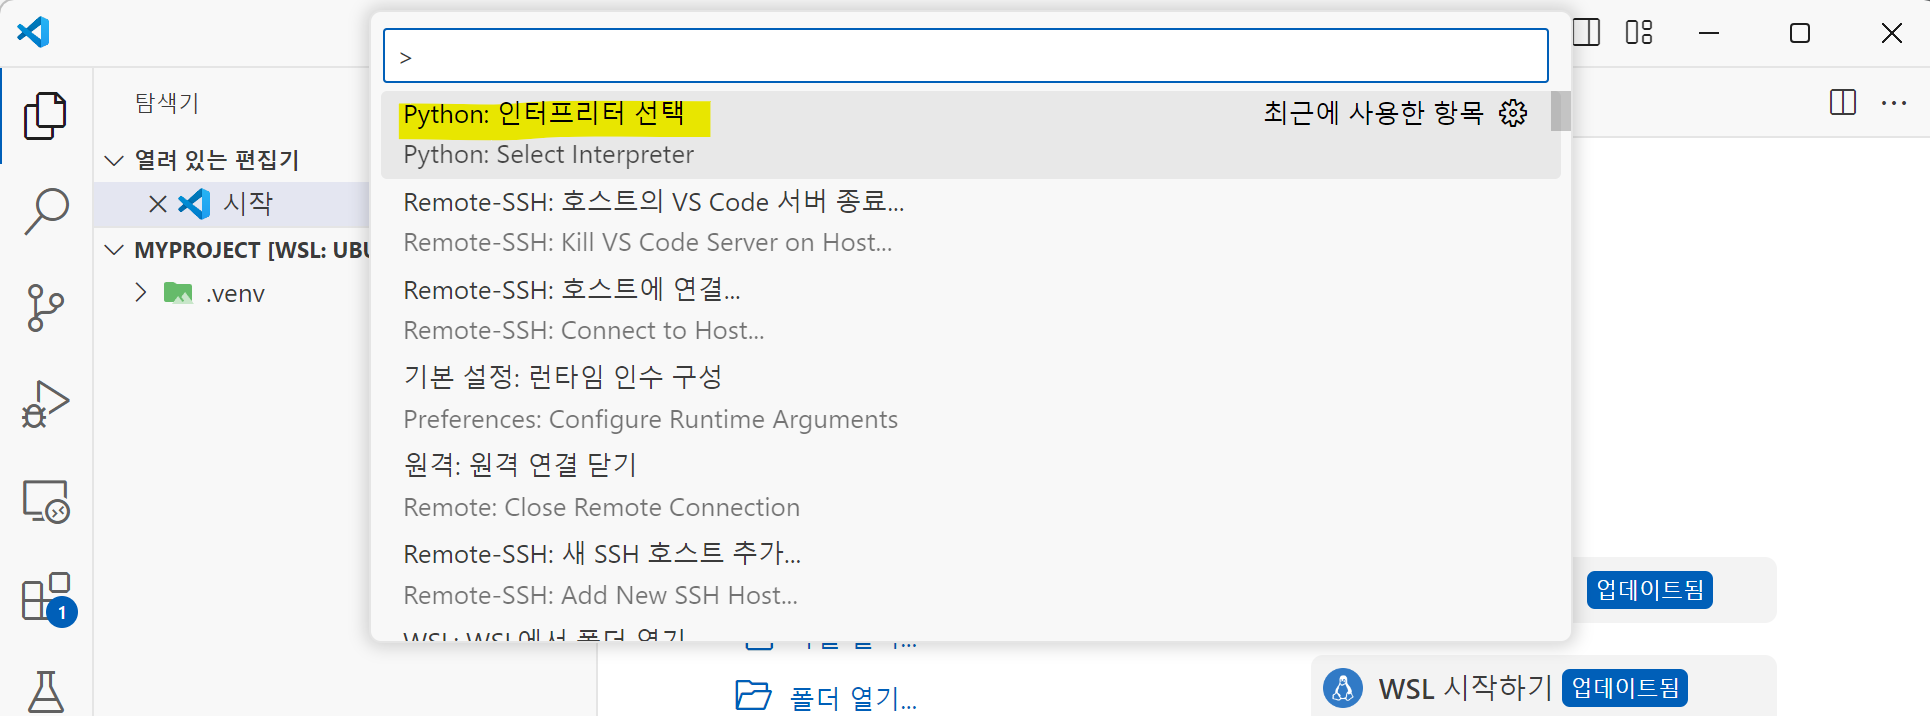
Python: 인터프리서 선택을 선택한다.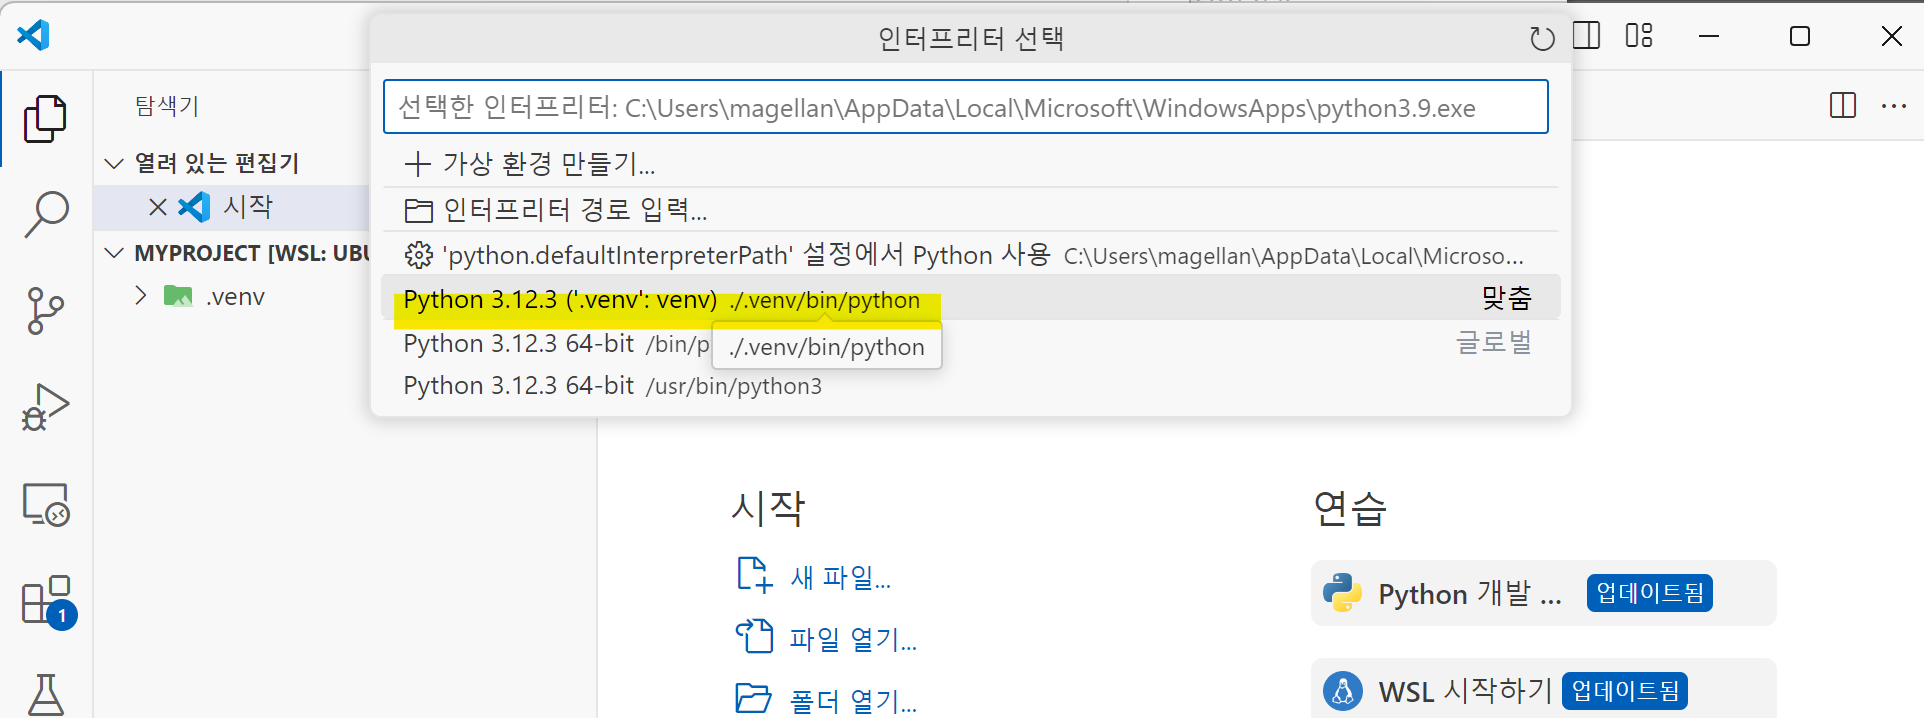
./.venv/bin/python 을 선택한다.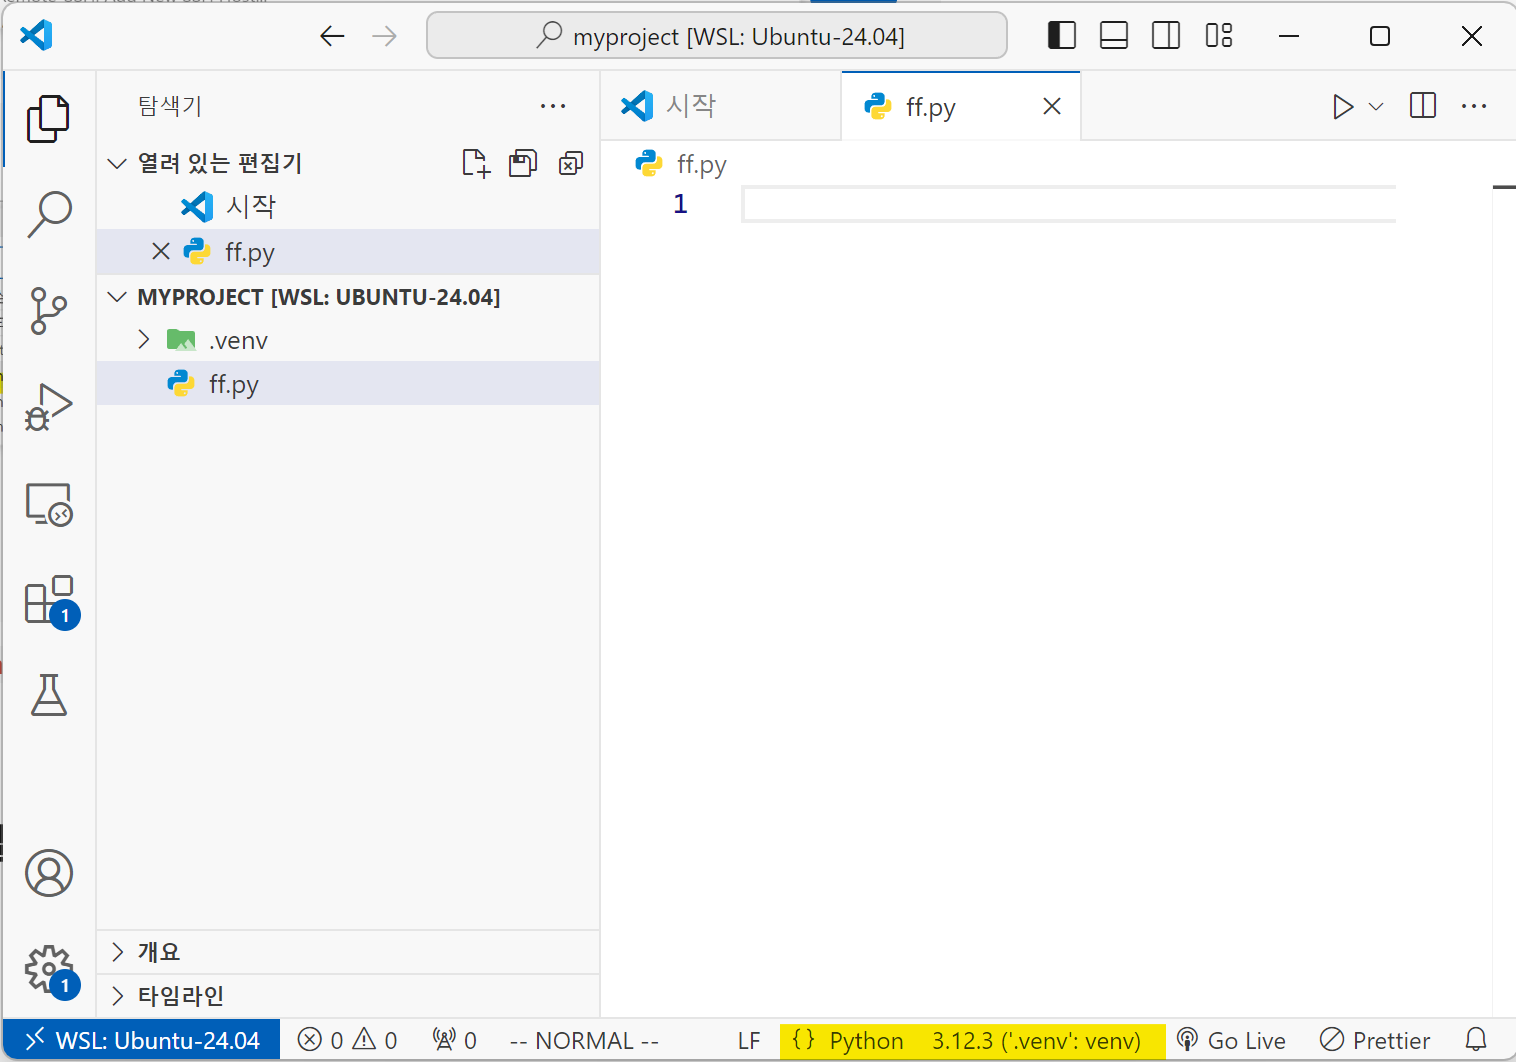
파이썬 파일을 만들었을 때 파이썬 인터프리터를 상태바에서 확인.
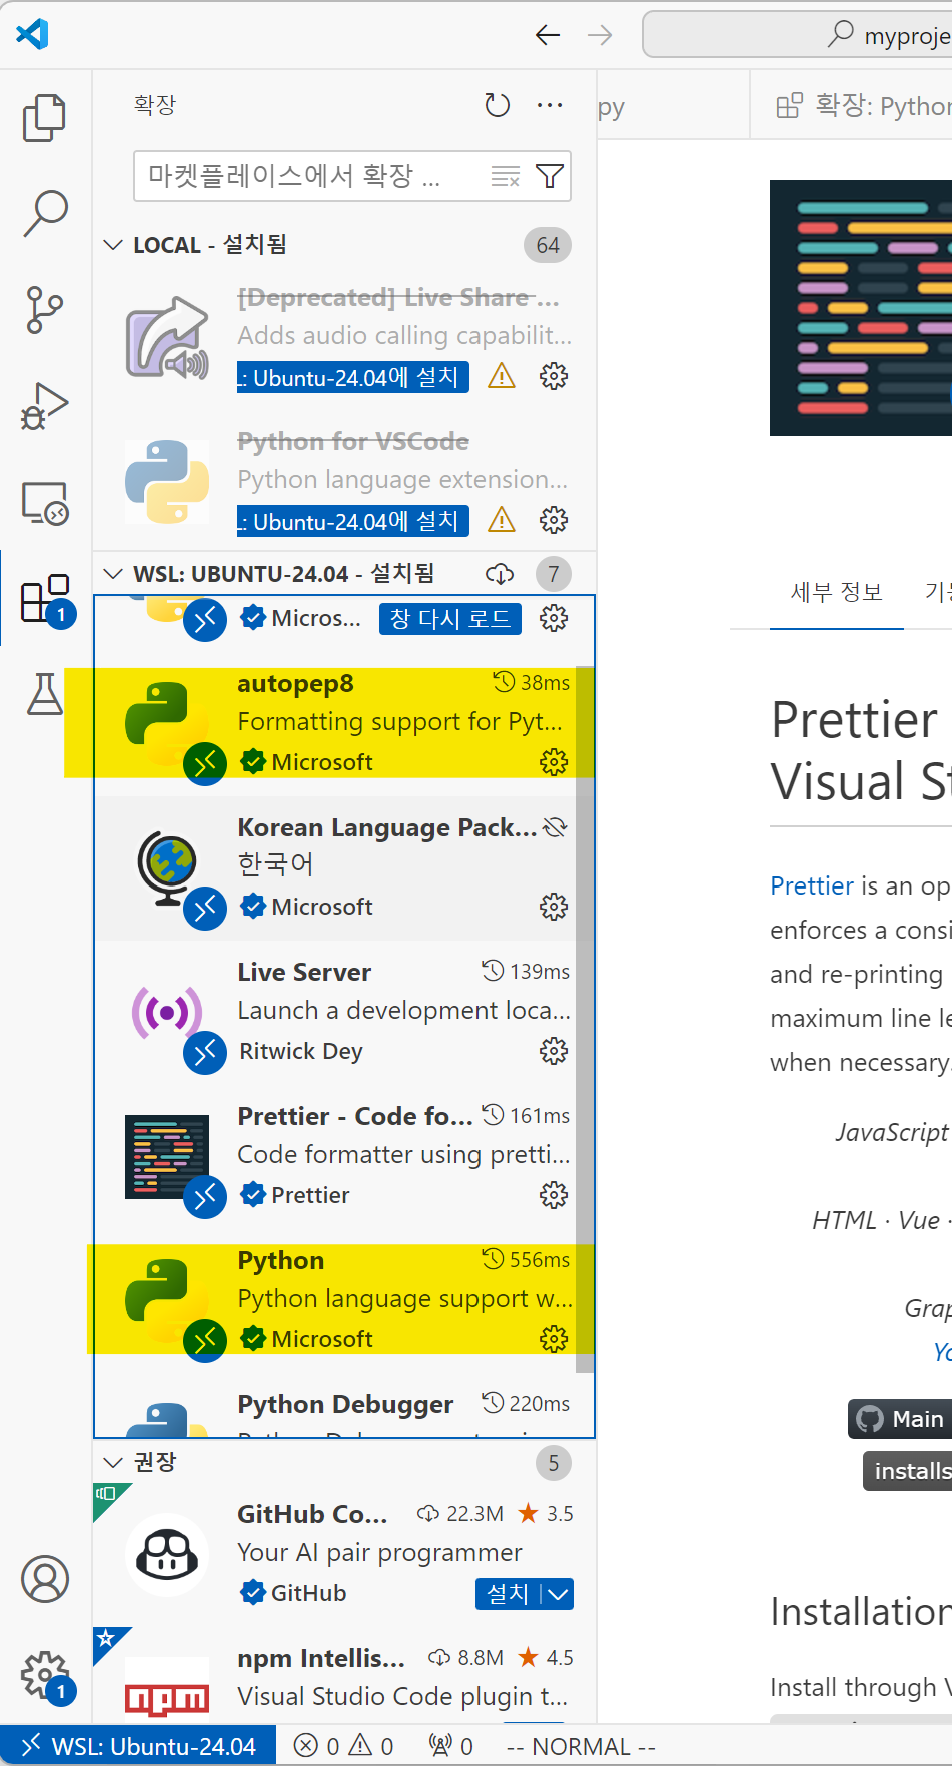
vscode 확장탭에서 Python, autopep8 설치
(윈도우 wsl이라면 wsl에 설치 주의)
6. Workers 개발환경
6.1 node.js 설치
https://nodejs.org/en/download/prebuilt-binaries 접속하여 환경에 맞는 파일을 다운로드 한다.
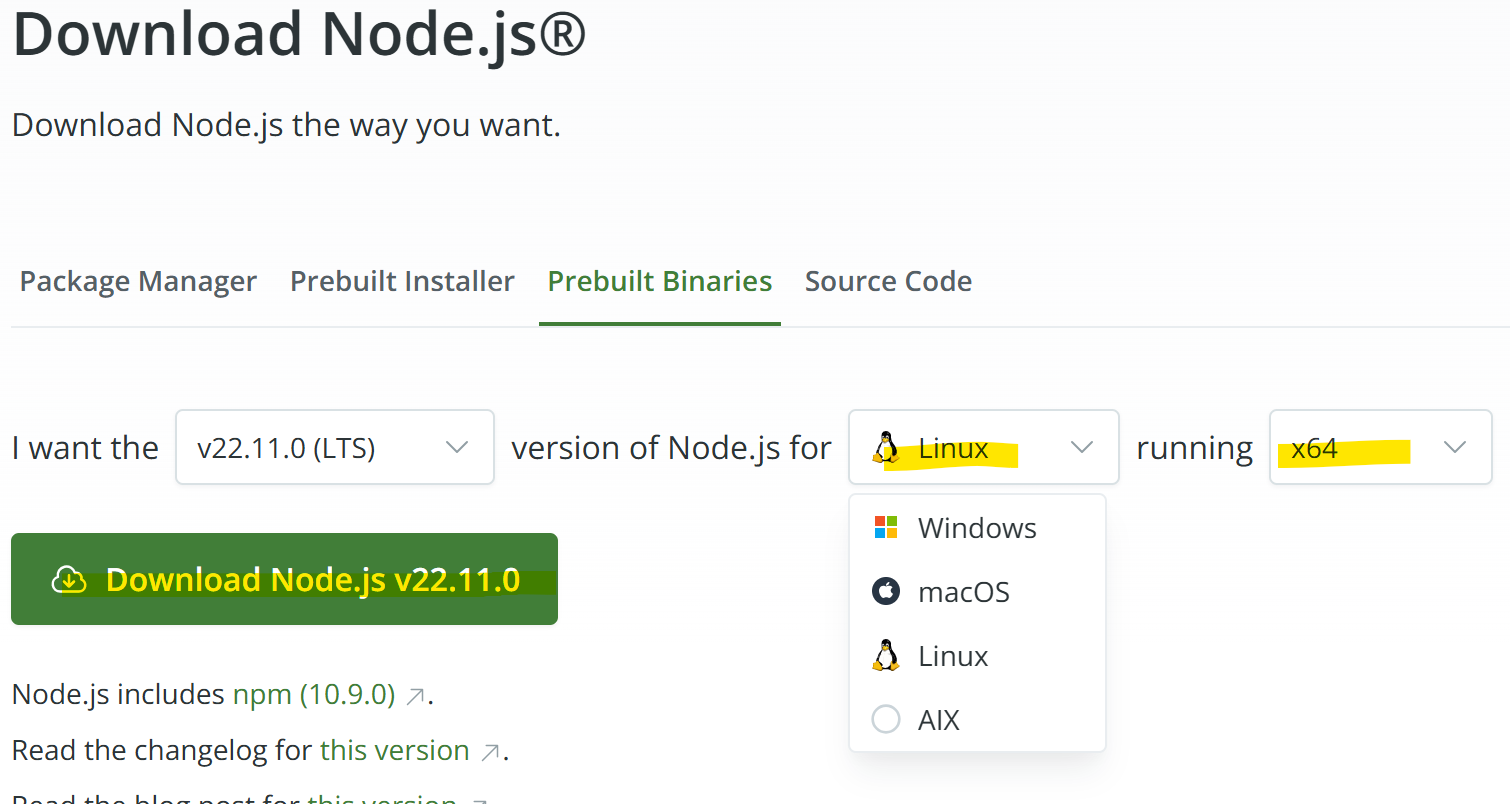
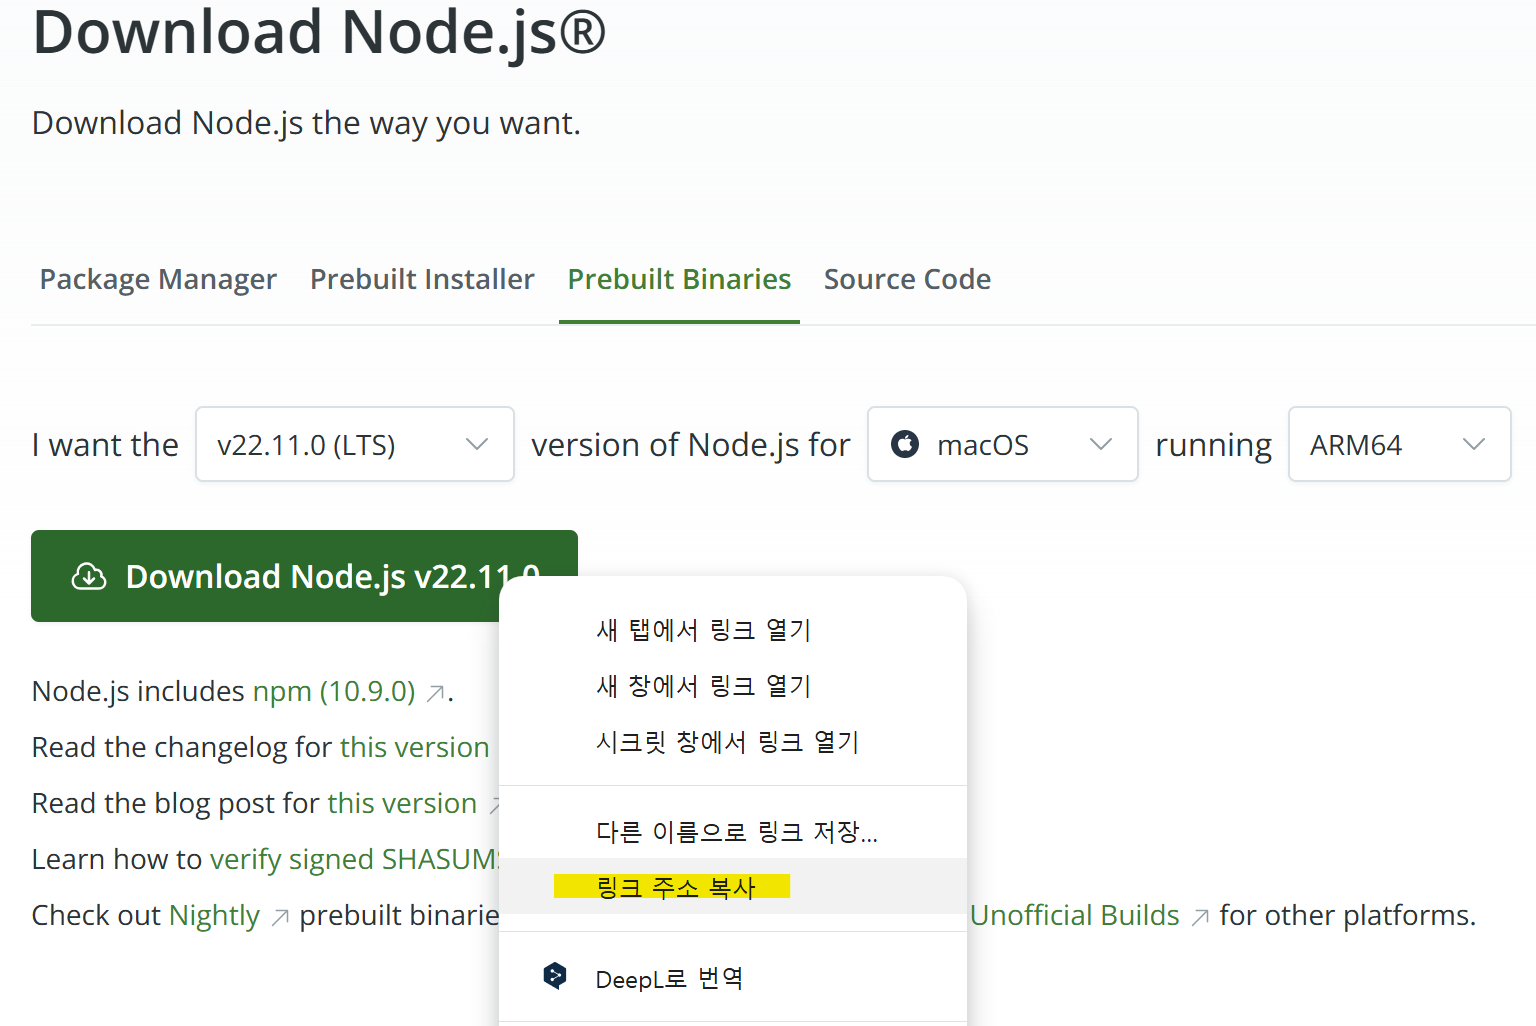
맥이라면 macOS를 선택하고 ARM64를 선택한다.
Download Node.js 버튼에서 마우스오른쪽버튼을 눌러 메뉴를 부른 후 링크를 복사한다.
이제 터미널을 열고 다운로드 한다.
$ curl -O https://nodejs.org/dist/v22.11.0/node-v22.11.0-darwin-arm64.tar.gz
압축을 풀고 소프트링크를 건다.
$ tar xpvf node-v22.11.0-linux-x64.tar.xz
$ ln -sf node-v22.11.0-linux-x64 node
node의 실행경로를 추가한다.
wsl에서는 .bashrc
맥에서는 .zshrc
를 열어서 맨 마지막에 설정을 추가한다.
export PATH=$PATH:~/node/bin
터미널을 다시 실행해서 경로를 적용한다.
또는
$ . .bashrc
이렇게 바로 적용한다.
node가 잘 실행되는지 확인한다.
$ node -v
v22.11.0
$ npm -v
10.8.2
6.2 Wrangler 설치
프로젝트를 담을 디렉토리를 만들고 그 안에서 wrangler를 설치한다.
$ mkdir Projects
$ cd Projects
$ npm install wrangler --save-dev
$ npm install wrangler@latest  # 최신버전으로 업데이트
$ npm wrangler -v
6.3 프로젝트 생성
npm create cloudflare@latest
Need to install the following packages:
create-cloudflare@2.27.3
Ok to proceed? (y) y


> npx
> create-cloudflare


 ╭──────────────────────────────────────────────────────────────╮
 │ 👋 Welcome to create-cloudflare v2.27.3!                     │
 │ 🧡 Let's get started.                                        │
 ╰──────────────────────────────────────────────────────────────╯
╭ Create an application with Cloudflare Step 1 of 3
│
├ In which directory do you want to create your application?
│ dir ./testproject
│
├ What would you like to start with?
│ category Hello World example
│
├ Which template would you like to use?
│ type Hello World Worker
│
├ Which language do you want to use?
│ lang JavaScript
│
├ Copying template files
│ files copied to project directory
│
├ Updating name in `package.json`
│ updated `package.json`
│
├ Installing dependencies
│ installed via `npm install`
│
╰ Application created

╭ Configuring your application for Cloudflare Step 2 of 3
│
├ Retrieving current workerd compatibility date
│ compatibility date 2024-09-19
│
├ Do you want to use git for version control?
│ yes git
│
├ Must configure `user.name` and user.email` to use git. Continuing without git.
│
╰ Application configured

╭ Deploy with Cloudflare Step 3 of 3
│
├ Do you want to deploy your application?
│ no deploy via `npm run deploy`
│
╰ Done

 ╭──────────────────────────────────────────────────────────────╮
 │ 🎉  SUCCESS  Application created successfully!               │
 │                                                              │
 │ 💻 Continue Developing                                       │
 │    Change directories: cd testproject                        │
 │    Start dev server: npm run start                           │
 │    Deploy: npm run deploy                                    │
 │                                                              │
 │ 📖 Explore Documentation                                     │
 │    https://developers.cloudflare.com/workers                 │
 │                                                              │
 │ 💬 Join our Community                                        │
 │    https://discord.cloudflare.com                            │
 ╰──────────────────────────────────────────────────────────────╯
프로젝트 이름을 물어보는데 이름을 정하고,
에제를 받을 것인지,
어떤 예제를 받을 것인지,
어떤 언어를 쓸 것인지 선택을 하면 의존성 패키지를 설치한다.
끝나면 이제부터 어떻게 해야 하는지 설명이 나온다.
6.4 개발
$ cd testproject
$ npm run start

> testproject@0.0.0 start
> wrangler dev


 ⛅️ wrangler 3.78.7
-------------------

? Would you like to help improve Wrangler by sending usage metrics to Cloudflare? › (Y/n)╭──────────────⎔ Starting local server...
[wrangler:inf] Ready on http://localhost:43347
╭──────────────────────────────────────────────────────────────────────────────────────────────────────╮
│ [b] open a browser, [d] open Devtools, [l] turn off local mode, [c] clear console, [x] to exit       │
╰──────────────────────────────────────────────────────────────────────────────────────────────────────╯
b 키를 누르면 웹브라우저가 실행되면서 페이지가 뜬다.이제
src/index.js 를 수정해본다.6.5 배포
$ npm run deploy

> testproject@0.0.0 deploy
> wrangler deploy


 ⛅️ wrangler 3.78.7
-------------------

Attempting to login via OAuth...
Opening a link in your default browser: https://dash.cloudflare.com/oauth2/auth?response_type=code&client_id=54d11594-84e4-41aa-b438-e81b8fa78ee7&redirect_uri=http%3A%2F%2Flocalhost%3A8976%2Foauth%2Fcallback&scope=account%3Aread%20user%3Aread%20workers%3Awrite%20workers_kv%3Awrite%20workers_routes%3Awrite%20workers_scripts%3Awrite%20workers_tail%3Aread%20d1%3Awrite%20pages%3Awrite%20zone%3Aread%20ssl_certs%3Awrite%20ai%3Awrite%20queues%3Awrite%20pipelines%3Awrite%20offline_access&state=L7hmEsRJVloiyw5LuWR4F638XwUqMjtC&code_challenge=hYwjXFypXQQzCWRKF9UhX0tGW8PI1O-a3fSBvVZb0C4&code_challenge_method=S256
디플로이 하면 로그인을 해야 되므로 웹브라우저에서 링크를 접속하라고 한다.
접속해보면 아래와 같이 화면이 뜬다.
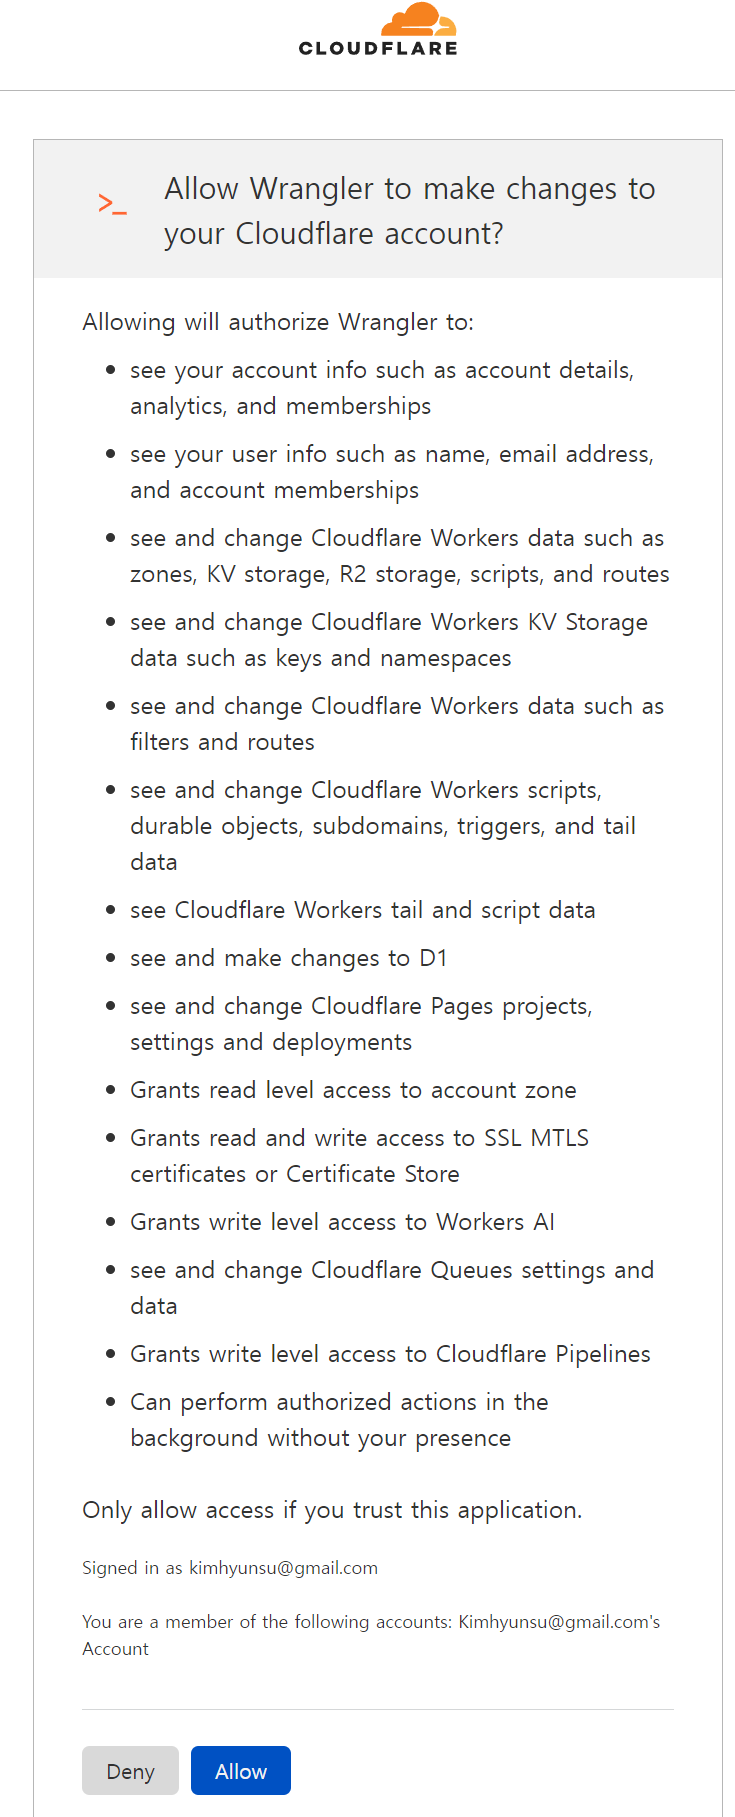
Allow 버튼을 클릭하면 화면이 바뀐다.
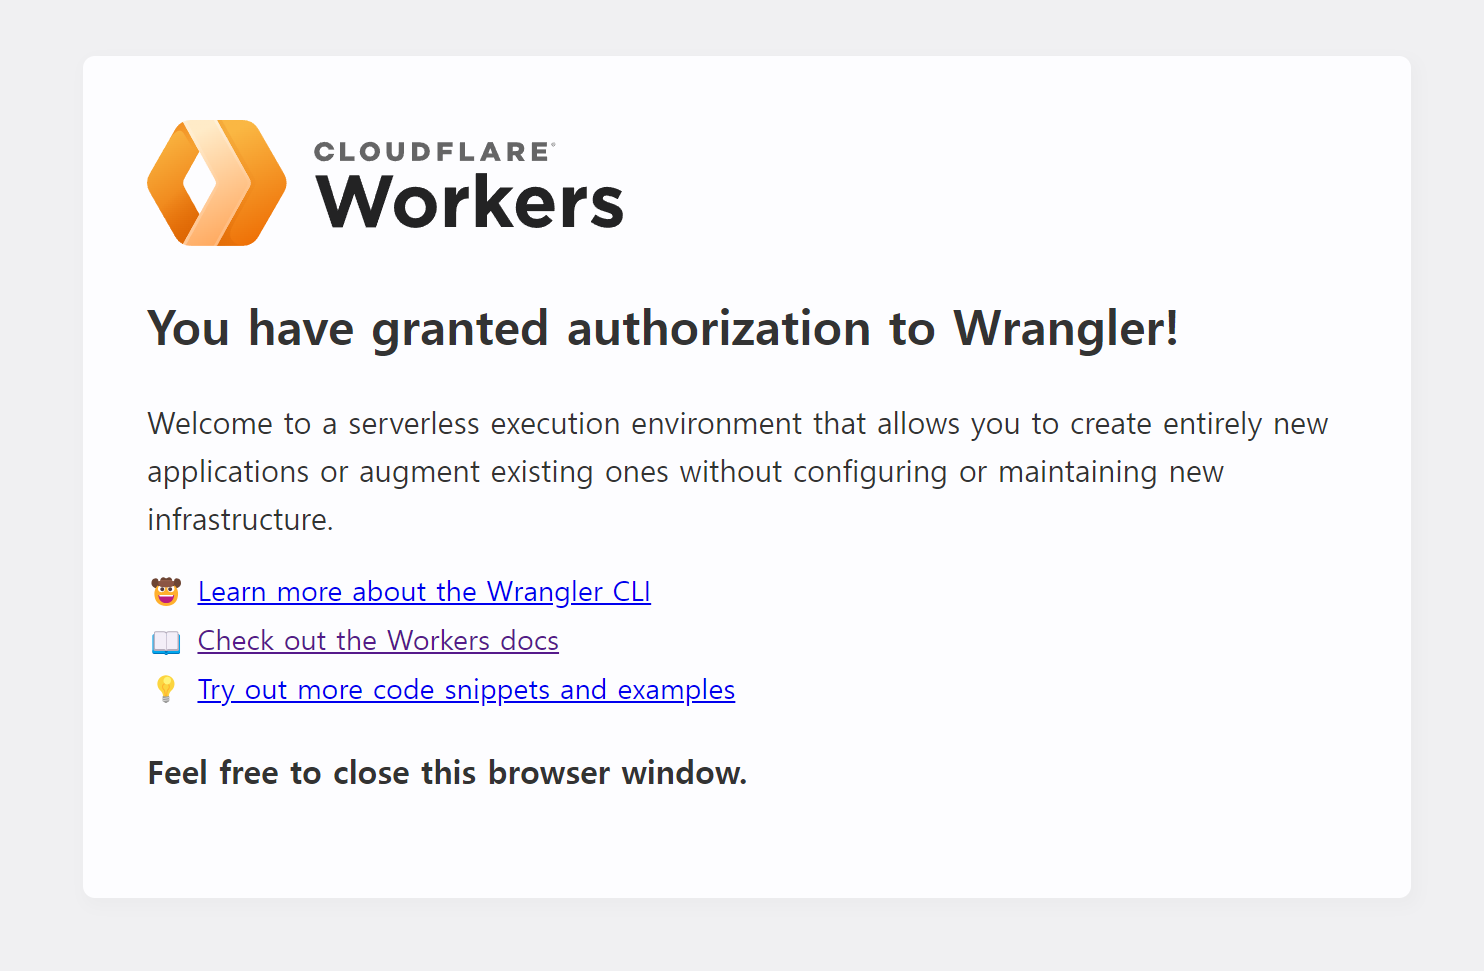
그리고 터미널에서는 로그인 했다는 메세지가 나온다.
Successfully logged in.
이 상태에서 멈춰 있으므로
Ctrl+C 로 중지 시킨 후 다시 실행해본다.$ npm run deploy
> testproject@0.0.0 deploy
> wrangler deploy
⛅️ wrangler 3.78.7
-------------------
Total Upload: 0.19 KiB / gzip: 0.16 KiB
✔ Would you like to help improve Wrangler by sending usage metrics to Cloudflare? … yes
Your choice has been saved in the following file: ../../.config/.wrangler/metrics.json.
You can override the user level setting for a project in `wrangler.toml`:
- to disable sending metrics for a project: `send_metrics = false`
- to enable sending metrics for a project: `send_metrics = true`
Uploaded testproject (8.19 sec)
Deployed testproject triggers (2.33 sec)
https://testproject.kimhyunsu.workers.dev
Current Version ID: 653d986b-64b3-48b3-992d-1f089998d21f
웹브라우저에서
https://testproject.<user_id>.workers.dev 에 접속해보면 Workers가 잘 작동하는 것을 볼 수 있다.